Vim Basics to Advanced: A Comprehensive Tutorial

A product designer pivoting to front-end development with a knack for writing and explaining complex concepts into easy-to-learn content that resonates with technical/non-technical folks about my journey and learnings in software development and engineering.
In this Guide, we will discuss Vim and cover its basics, intermediate and advanced actions that you can carry out.
What is Vim?
Vim (Vi IMproved) gained wide use as a text editor due to its advanced features compared to Vi. Bram Moolenar created Vim to address vi's deficiencies in critical functionalities compared to the Emacs text editor during the 90s. You can access Vim on Windows, Macs, and UNIX-like systems (Linux, Solaris, NetBSD., etc.).
Most applications involving servers use Vim as the default editor, making it a valuable tool for software engineers to learn. Vim focuses on enhancing typing speed for engineers.
Features of Vim
Vim includes several features:
Command-centric: With a few commands, you can perform complex tasks using text.
Memory: It maintains a low memory footprint.
Configuration: It offers high configurability and stores itself using simple text files.
Multiple windows/tabs: It splits screens into windows and lets you work on files simultaneously.
Plug-in: It enables you to utilize plug-ins that significantly extend its functionality.
How to install Vim
Vim operates on various operating systems. Mac comes with Vim pre-installed. To install Vim on your Windows system, visit the Vim site and follow the prompts.
Alternatively, Follow this Youtube How-to Guide to install Ubuntu. After installing, you need to type sudo apt install vim to install Vim. Then, open your terminal and type vim to get the image below:

The preceding image displays information about Vim and provides basic instructions for finding help and exiting Vim.
Vim Modes
You can perform actions in multiple modes in Vim. They are:
Command/default mode: Vim begins in the default mode. You can switch from this mode to another through this mode. This mode executes commands that do not have a colon (:) as a prefix.
Command line mode: Commands in this mode start with a colon (:). You can enter this mode from either command or insert mode. To switch from insert mode, press
Escto enter command mode and then type a colon (:).Insert mode: You can enter/edit your text in this mode. Press the
ikey to move from command to insert mode, and press theEsckey to return to command mode.Visual mode: You can run commands on selected text or sections. Press
vin command mode to enter this mode. In insert mode, press theEsckey and typevto switch to visual mode.
Vim Basics
In Vim, users commonly carry out the following basic actions:
Creating a new file
Inserting text in a file
Deleting text in a file
Yanking/cutting/pasting in a file
Navigating a file
Saving/exiting a file
Creating a new file
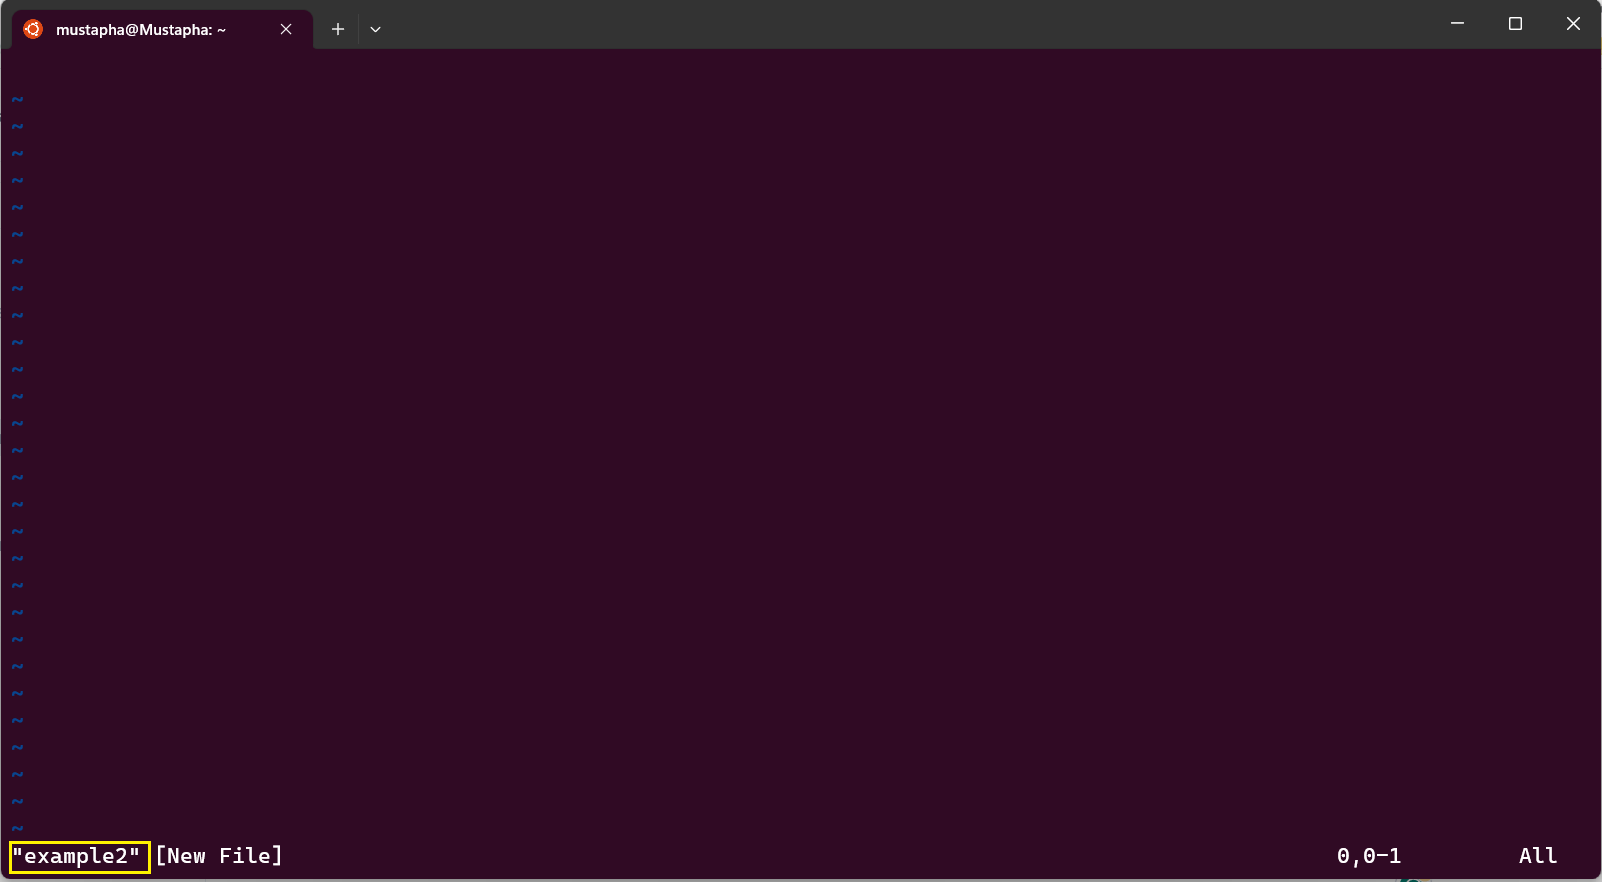
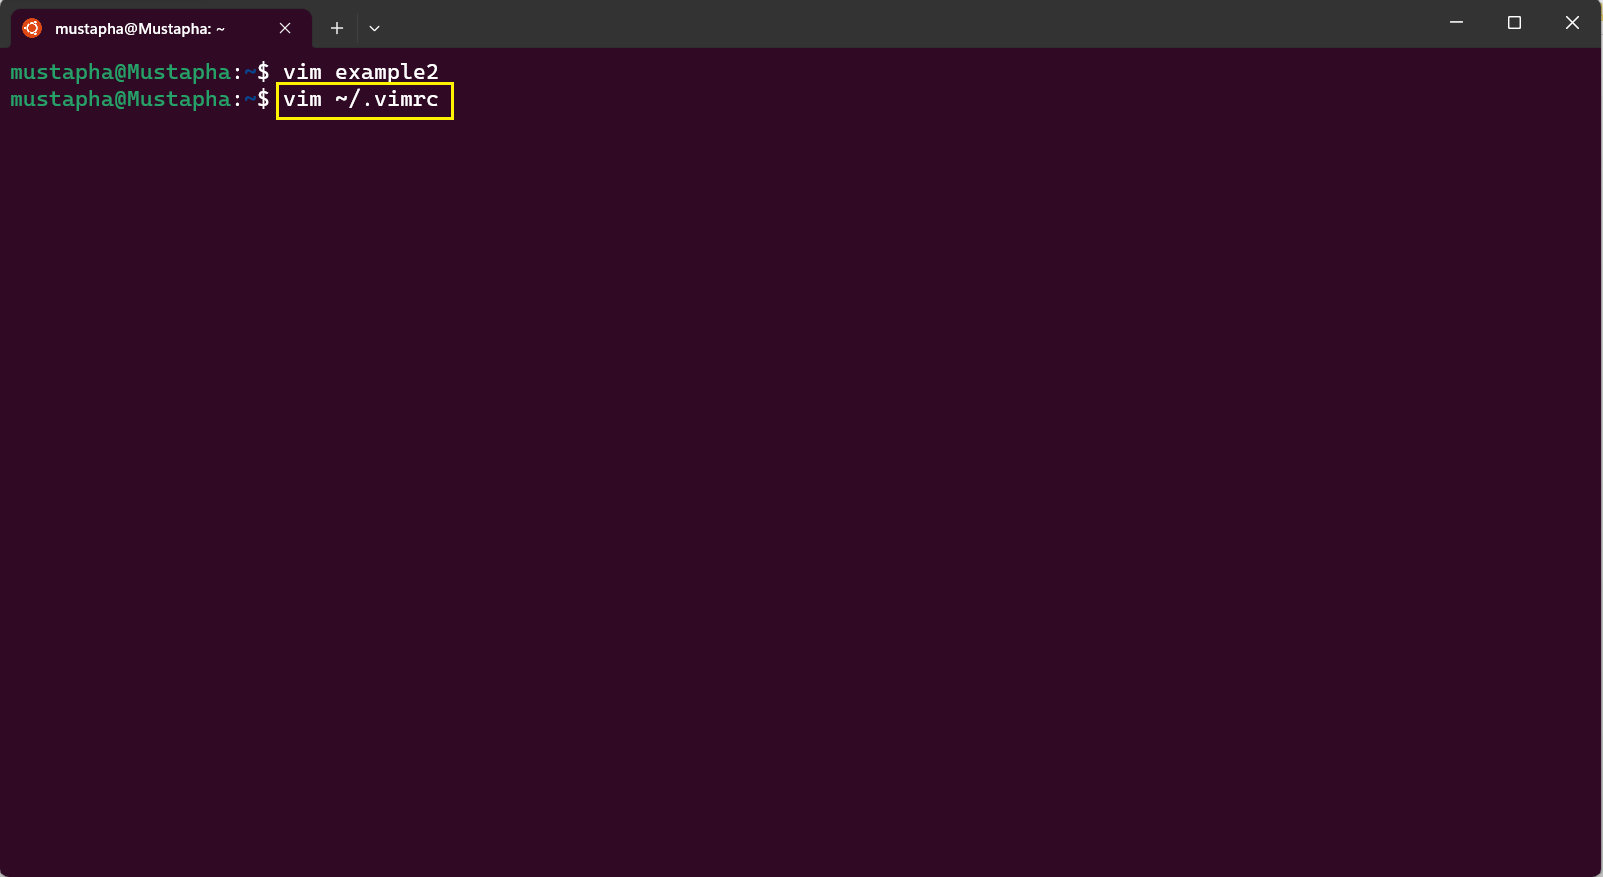
To create a new file, type Vim example2 in your terminal. If the file name example2 already exists, it will open instead. The following snapshot demonstrates the process of creating a new file named example2

After pressing Enter, you can perform actions in your new file shown in the following image. In the bottom left corner is the name of the file.
Inserting text in a file
To insert text into your file, press the i key. Pressing the i key puts you in insert mode, allowing you to input text into your file. After pressing i, you will see INSERT displayed at the bottom left corner.

Before using the following commands, switch back to command mode by pressing the Esc key.
You can use the following commands to insert text:
Note: Vim is case-sensitive. This means the system treats commands differently depending on whether they are in capital or lowercase.
I: To insert text at the beginning of the line despite the cursor's position.a: To insert text after your cursor's current placement.A: To insert text at the end of the line regardless of the cursor's position.o: To insert text below the line irrespective of your cursor's placement.O: To insert text above the line despite where your cursor's position.
Deleting text in a file
You delete text in your file using combined keys in command mode. Before typing in these commands, press the Esc key to go to command mode. You can use the following keys to delete:
dw: To delete a word. Move your cursor to the beginning to completely delete.d<n>w: To delete more than one word in a single line. "n" is a number. For example,d2wdeletes two words.d0: To delete everything from where your cursor is to the beginning of the line.d$: To delete everything after your cursor. To delete the line completely, move the cursor to the start of the line.dG: To delete from the line you are on to the end of your file.D: To delete the line of text from the current cursor position to the end of the line.
Yanking, cutting, and pasting in a file
In command mode, you can use commands to yank (copy), cut, and paste your text. Press the Esc key to switch to command mode. To carry out these actions, you can use the following commands:
yy: To yank an entire line.Y: To yank/copy the rest of the line from where your cursor is.yw: To copy a word.<n>yy: To specify the number of lines to yank. "n" represents a number. e.g.3yyYanks three lines, and7yyYanks seven lines.dd: To cut an entire line regardless of the cursor's position.<n>dd: To specify the number of lines you want to cut/clip. "n" is a number.e.g.
6ddcuts six lines.p: To paste below the current line you are on.P: To paste above the current line you are on.
Navigating a file
In command mode, you can move around in your file in a few ways. You can use the arrow keys on your keyboard or the following command keys:
k: To navigate up in the file.j: To navigate down in the file.h: To navigate right in the file.l: To navigate/move left in the file.0(zero): To navigate to the beginning of a line of text.$: To navigate to the ending of a line of text.w: To jump forward from one word to another.b: To jump backward from one word to another.gg: To jump to the beginning of a file.G: To jump to the end of a file.<n>G: To jump to a specific line. "n" is a number. For example,129Gto jump to line 129 and142Gto jump to line 142.
Saving/exiting a file
You can save/exit your file in command and command-line modes. You perform commands with the colon (:) prefix in the command line, while commands without the colon (:) prefix are executed in command mode. Below, we list a few commands:
:w: To save a file. This stores your file without giving feedback.:wq: To save and exit a file.:q: To quit without saving your file. This works if you haven't made any changes to the file.:!q: To save your file and discard any changes made.ZZ: To save and exit your file in command mode.
Vim Intermediate
In Vim, users can carry out the following intermediate actions:
Editing a file
Searching in a file
Editing a file
You can replace, change, or indent text in your life. Additionally, you can undo, redo or repeat actions. These actions are essential for a software engineer/programmer. To carry out these actions, you can use the following commands:
r: To replace a character with another character. For example, changingatob./R: As soon as you start typing, the whole line from where your cursor is gets replaced.💡Pressing the backspace button on the text written in the replace mode reverts it to the previous text. To make your replaced text permanent, you will have to press theEsckey.cc: To delete an entire line and then change it all at once. You can type in the new text after executing this command.C: To change the rest of the line from where your cursor is.>>: To manually indent the text to the right.<<: To manually indent to the left.==: To indent your code automatically at the position of your cursor. This command proves useful for programming languages such as C and Java but lacks the same usefulness for Python.gg=G: To indent your entire file.u: To undo an action.ctrl + r: To redo an action..(full stop): To repeat your last action.
Searching in a file
You can search and replace text in your file. To carry out these actions, you can use the following commands:
/<word>: To search a particular word.An example is
/beginin the following image. Typingnwill move you to the subsequent matchingbeginin the file, whileNwill take you back to the previous matchingbegin.
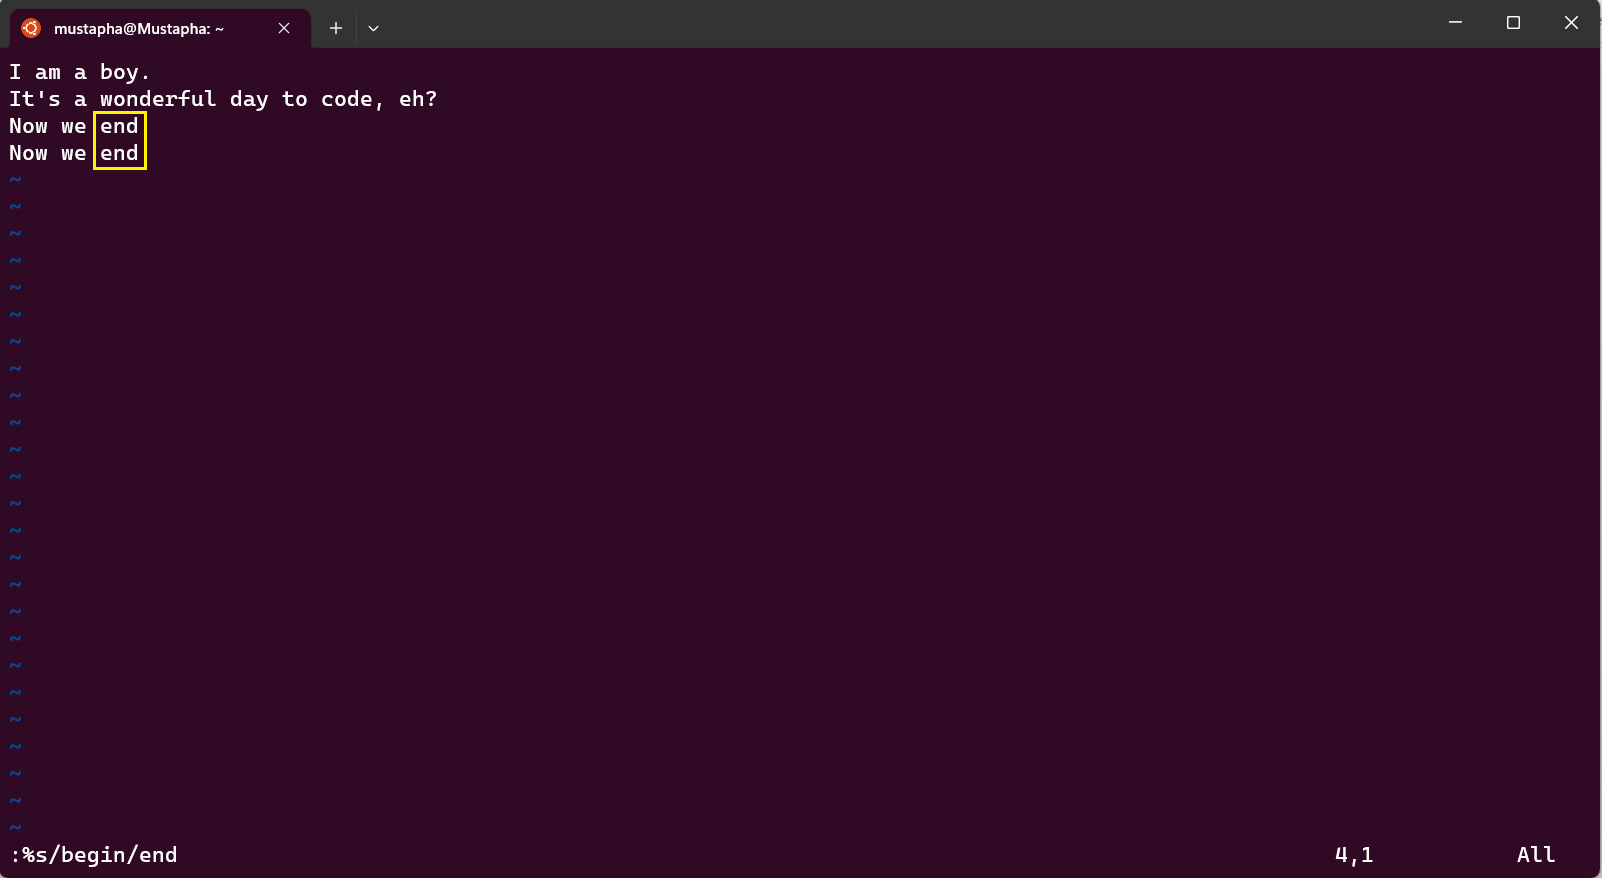
:s/<word>/<new word>: To substitute a word with another word at the location of your cursor. "s" means substitute. This command is in command-line mode due to its (:) prefix.:%s/<word>/<new word>: To replace a word with another in the entire file. "%" means in the whole file. For example,:%s/begin/endsubstitutesbeginwithend.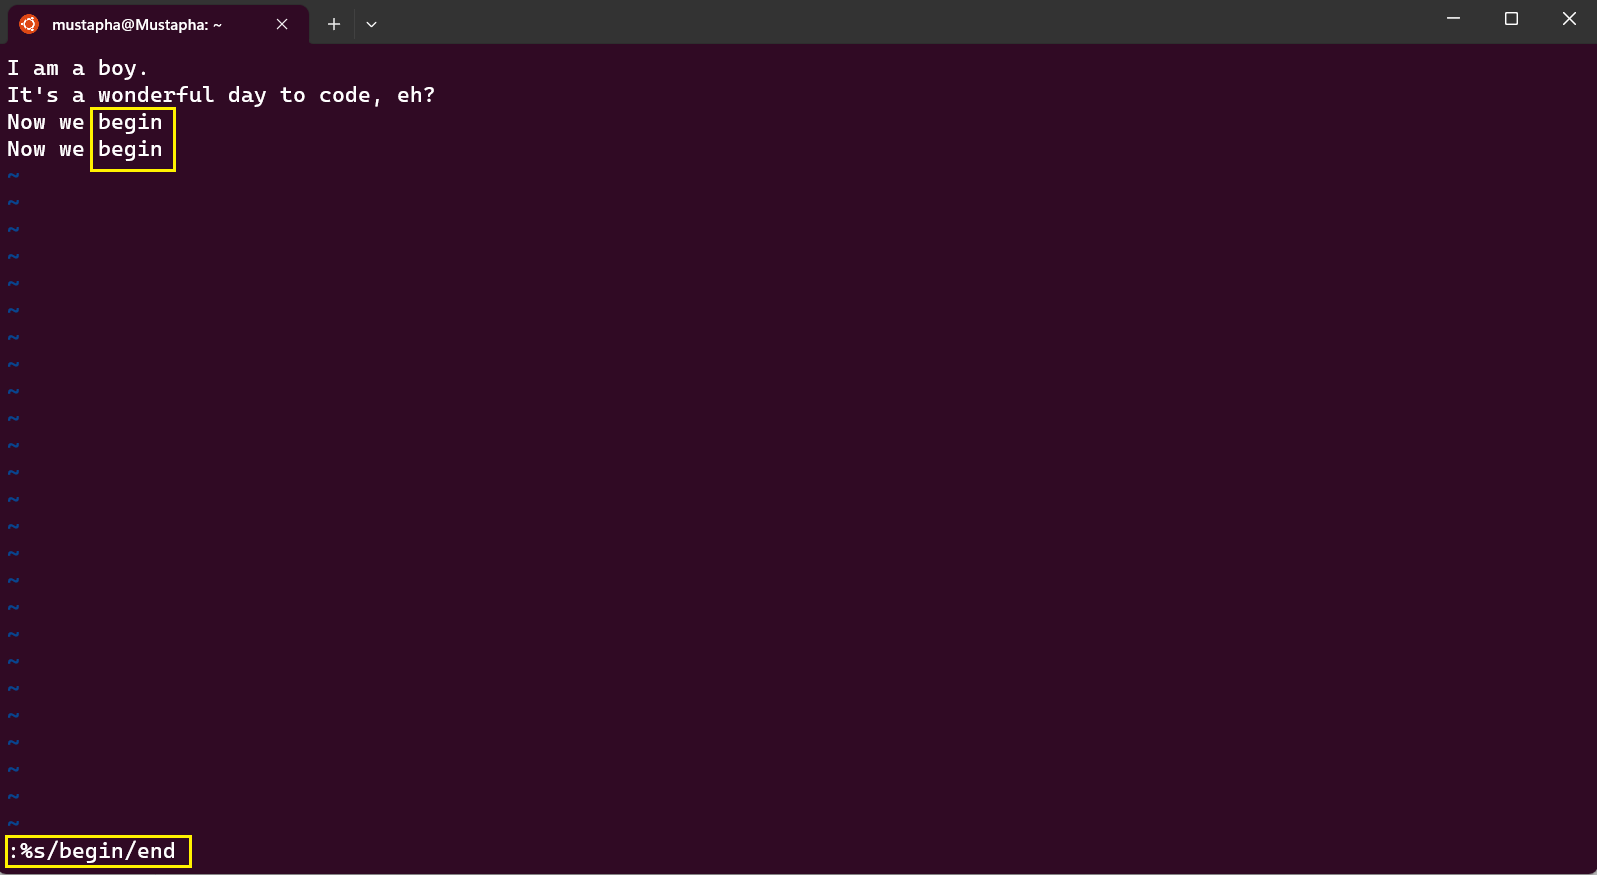
Vim Advanced
In Vim, users can use the following advanced methods:
Registers
Macros
Visual mode
Configuration
- vimrc file
Registers
Registers store text, commands, and macros like a clipboard and allow you to retrieve them later with their unique identifier. Placing double quotes " before an identifier enables access to the mentioned register. For example, "a access what is in the register a.
To view all registers, you can type :reg

After pressing Enter key
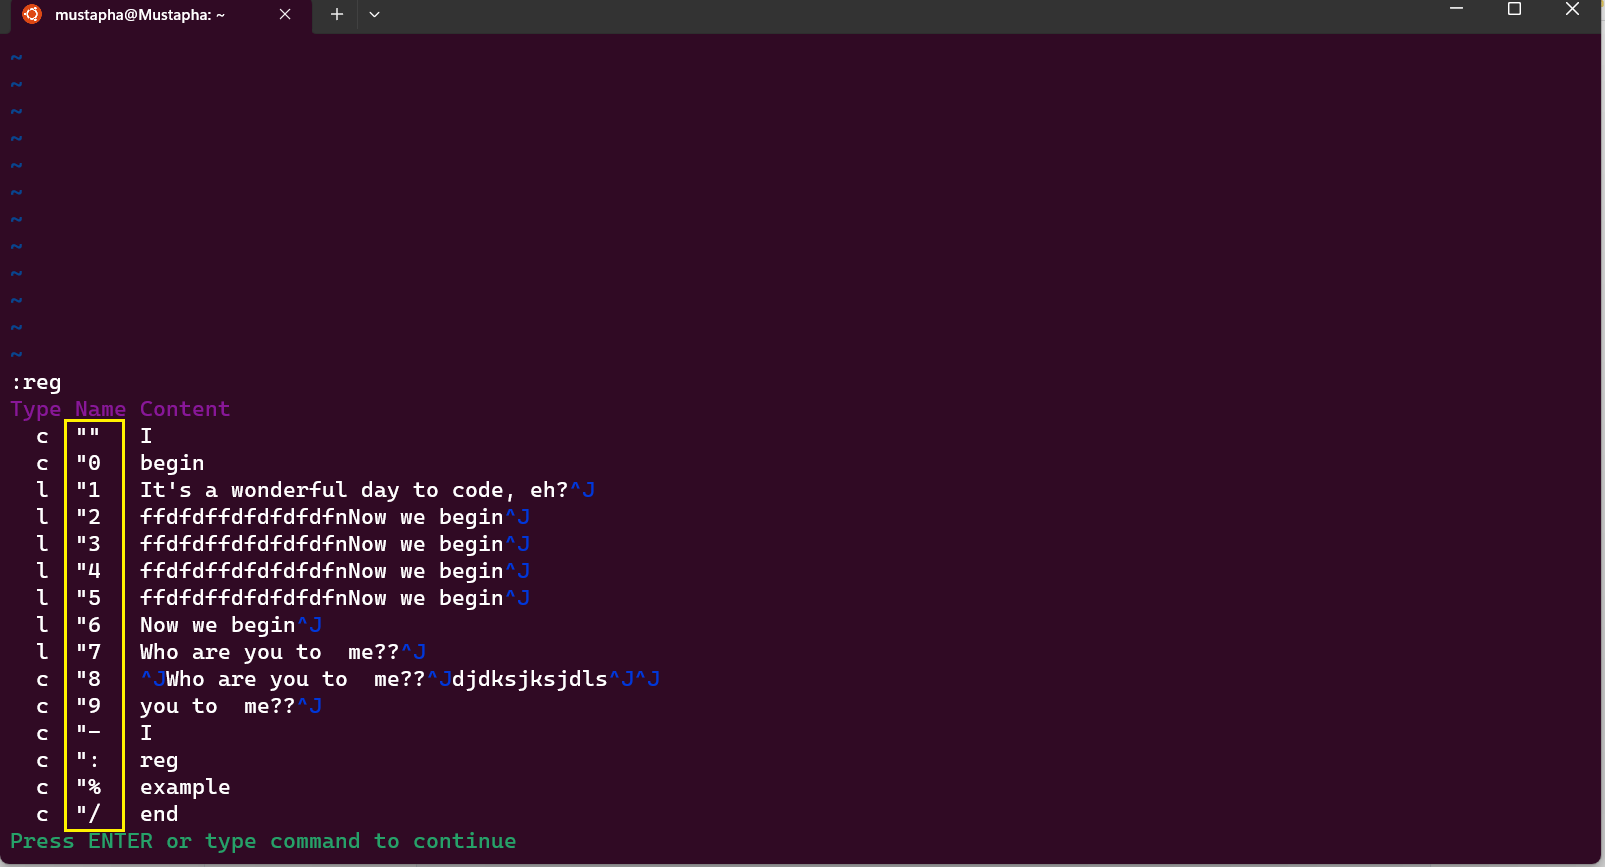
In the preceding image, you can see all registers that the file stores. The "" is the default or unnamed register that saves text that is deleted or yanked. If a register identifier is not stated, the content in the default register "" will be posted.
The registers in the preceding image, ranging from "0 to "9 are called numbered registers. "0 represents the content of your latest Yank, while "1 to "9 contains the content of your newest to oldest Yanks.
Register : and % are read-only registers. The : register is the recently executed command. The % register is the current file name or path opened.
Macros
Macros record a sequence of commands to execute an action/task. Macros' use case is to automate tedious tasks. Macros boost your workflow and speed. A register saves the command sequences of a macro.
You use macros to record the commands required to execute an action or task, save them to a register, and replay the macro whenever you need to repeat the action/ task. To record a macro, type q, then a letter from a to z representing the register to save the macro, input the commands you want to record, and finally, type q to stop the recording.
The following image depicts recording a macro and saving it into the register a by using the command qa. The bottom left corner displays the ongoing recording of your macro.
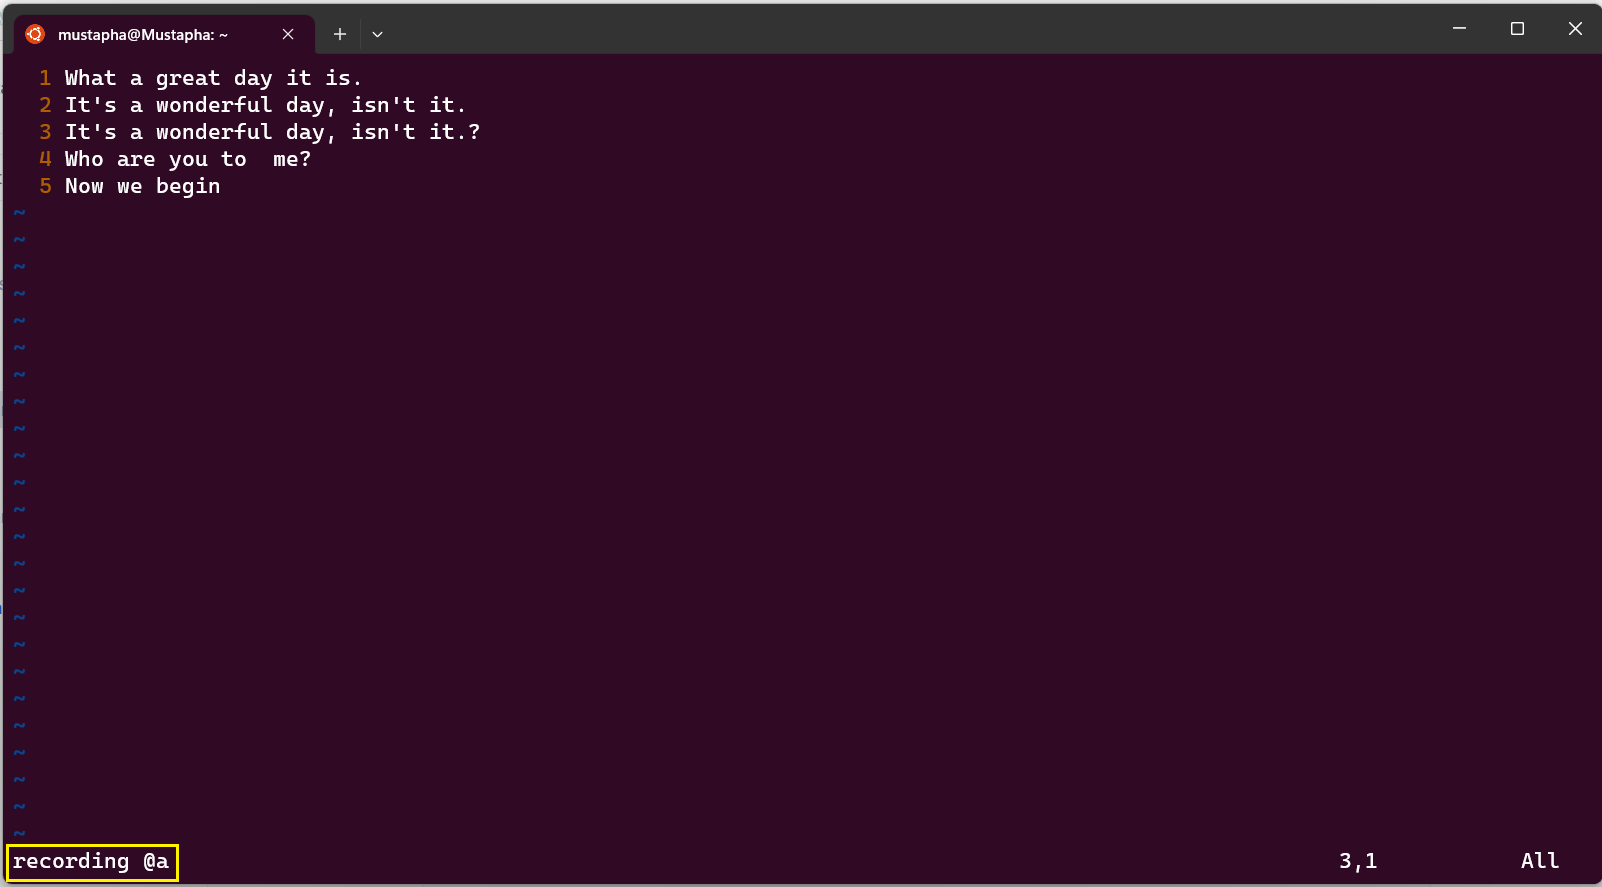
We will record d3wAi in the register a. The d3w deletes the first three words. The A moves your cursor to the end of the line. The i inserts text into your file.
I Inserted "I guess it is" and pressed q to end the recording. The macro gets saved into a.
Macros are saved into Vim registers. Typing :reg in your file lets you see the list of commands and lines of text saved.
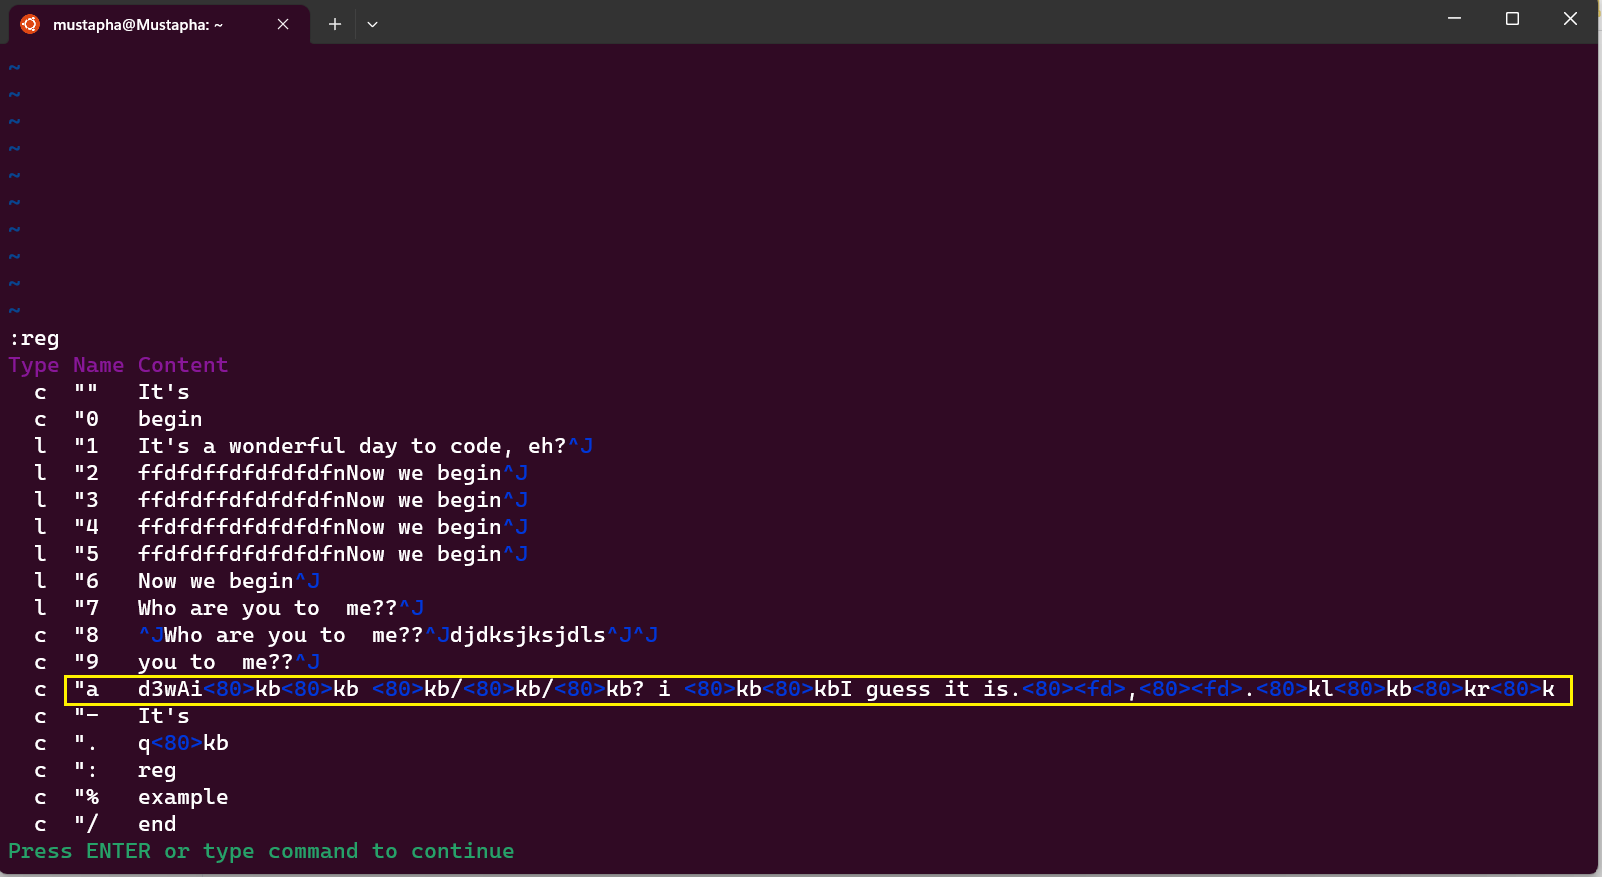
In the preceding image, macro a records d3wAi and the text "I guess it is." You can call this macro in your file by using the @ key.
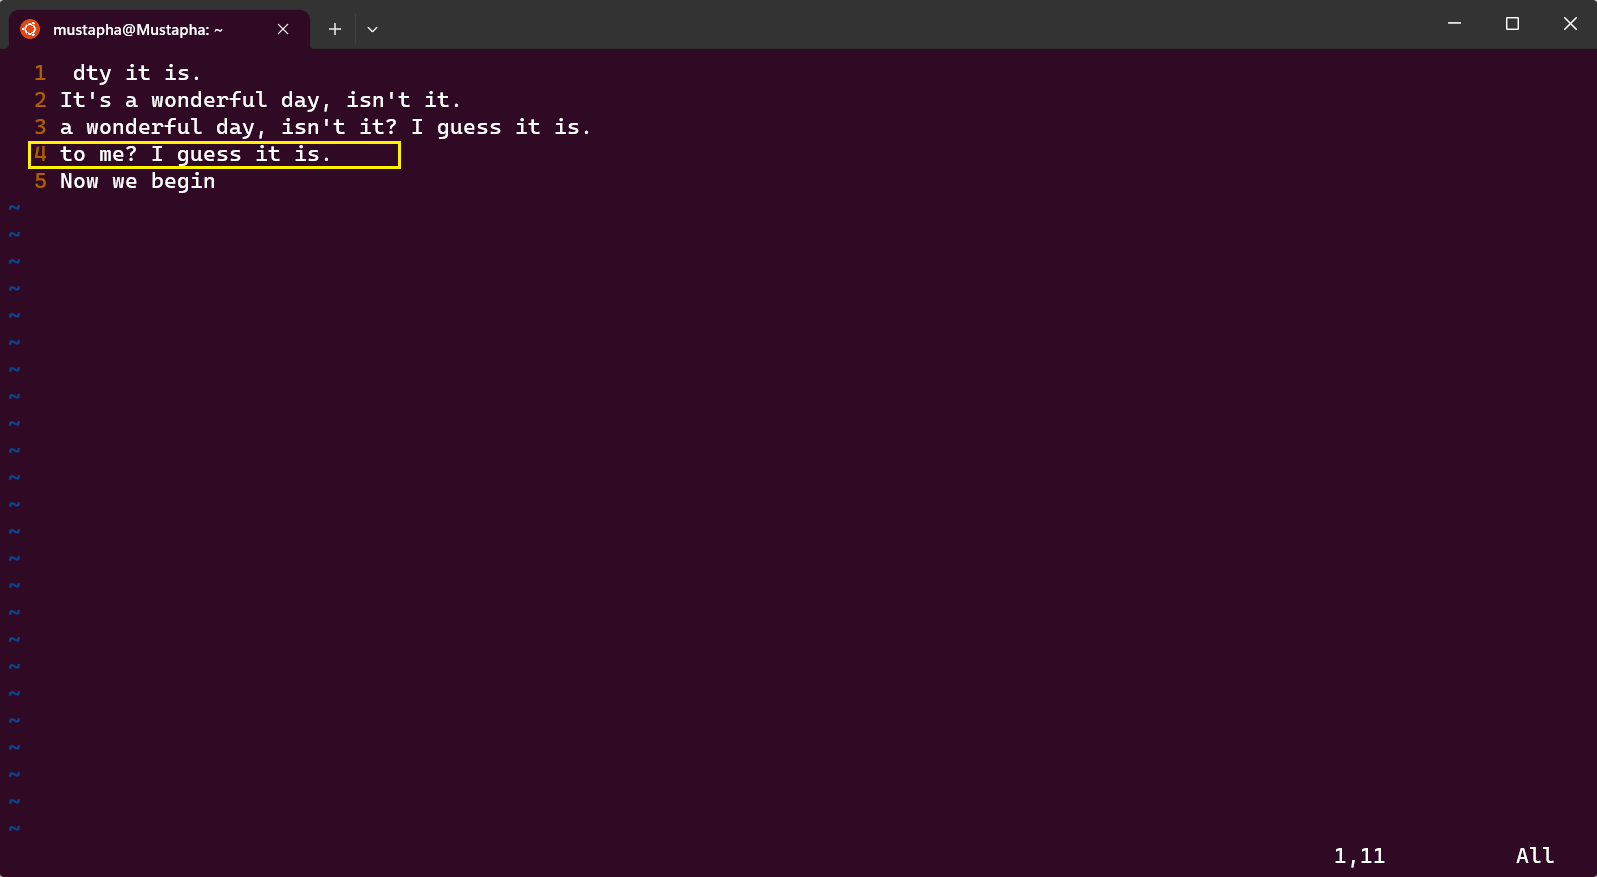
Press Enter to continue and return to your file. Note the content of line 4 in the following image.

Type @a to call the macro a. It deletes "Who are you" and adds "I guess it is" at the end of line 4 in the following image.
Visual mode
In visual mode, you can select text visually and execute commands within the selected sections or blocks. Pressing v switches you to visual mode from default mode. Pressing the Esc key twice leaves this mode.
Esc and then type v.The text VISUAL in the following image indicates you are in visual mode.

Use the arrow keys to select text.

In this mode, you can use various commands to complete actions such as deleting, yanking, copying, etc.
Configuration
You can activate configurations or settings to personalize Vim to suit your needs. Listed below are a few executable commands:
:set number: To turn on line numbers. The image below shows the state before pressing theEnterkey.
After pressing the
Enterkey,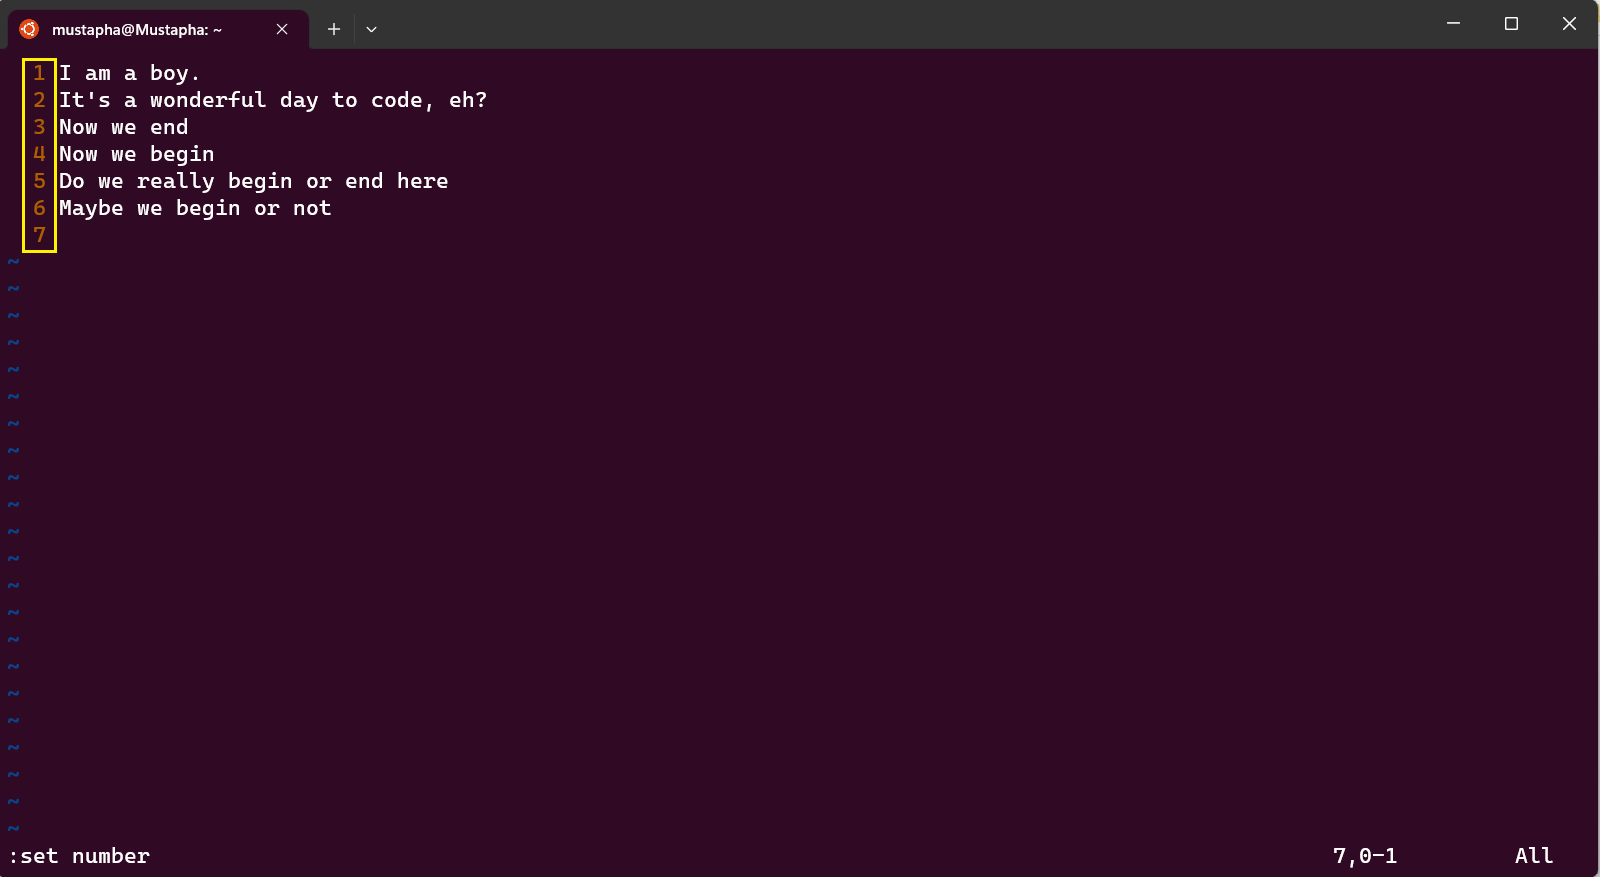
:set mouse = a: To activate the mouse for navigating the file instead of relying on the keyboard.:colorscheme: To change the color scheme being used. You have a couple of color schemes to choose from. Examples are blue, dark blue, default, slate, etc.:set numberwidth =<n>: To set the width of the number line to the margin.
You lose these settings once you exit the file you set them in. To make it permanent, create a configuration file called a vimrc file**.** In Windows, the filename is _vimrc , whereas on a Linux distribution system like Ubuntu, it's .vimrc
Vimrc file
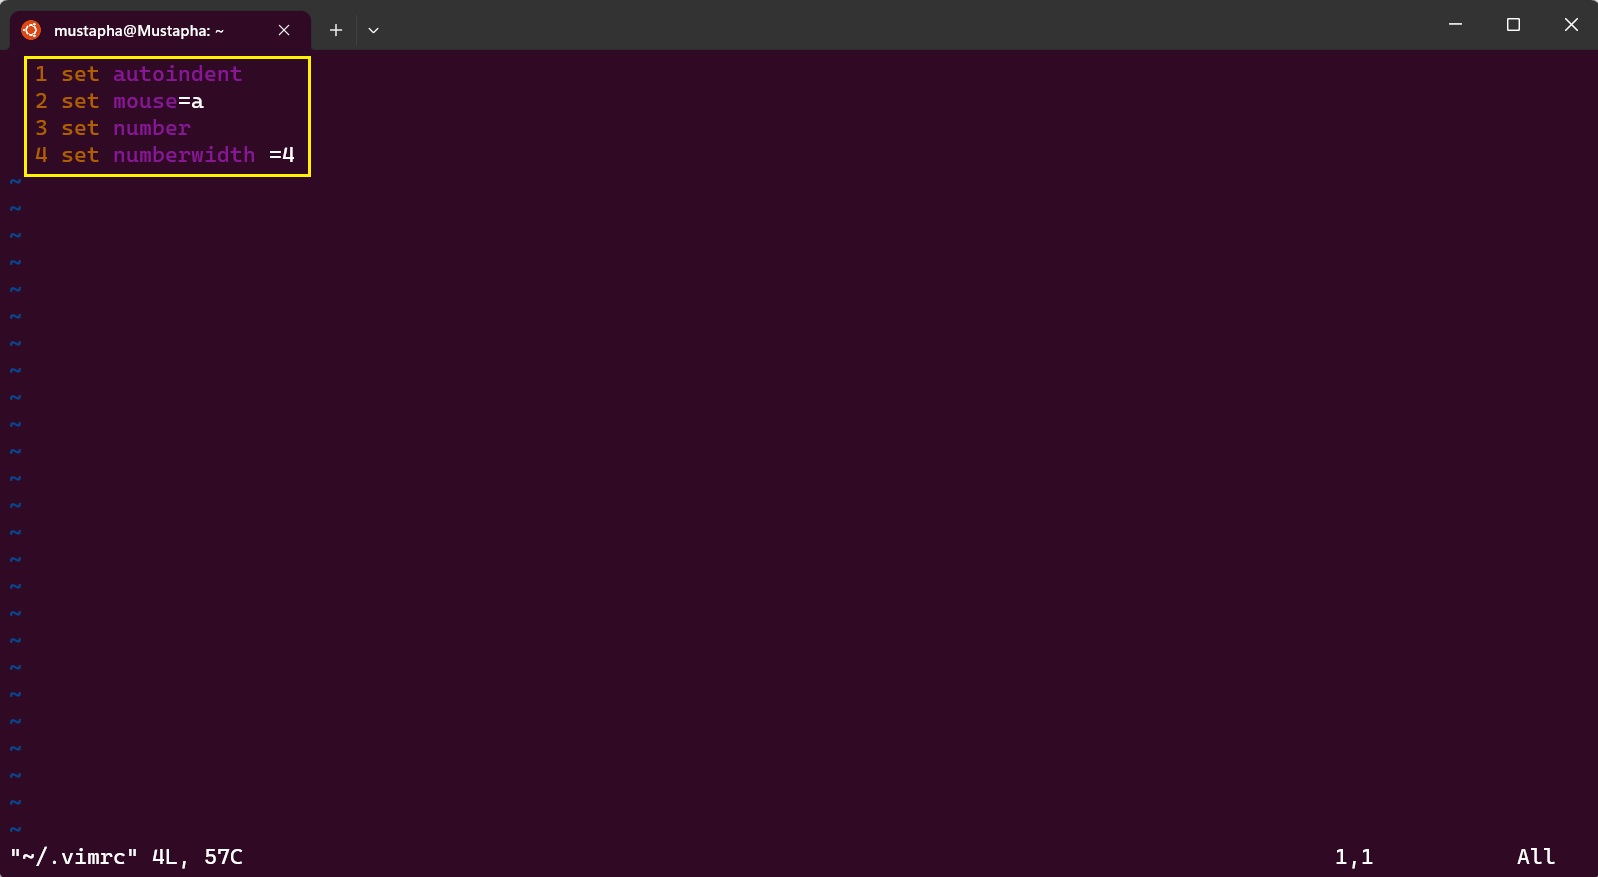
This file contains all active configurations or settings on your Vim files. Typing vim ~/.vimrc creates the file if it doesn't exist and opens it if it does.
After pressing Enter, you can type in all the settings you want and save them using :w or :wq
In the Vim file, the configurations you set remain active and permanent. To undo any setting, access the Vimrc file and undo them.
Conclusion
Congratulations on reaching the end of the tutorial. We have learned about Vim, delved into its basics to advanced usage as a text editor in Linux, and discovered how to configure it to meet your needs. We also explored the visual mode in Vim and how to use it. I hope you found this tutorial helpful and enjoyed it.

